
Many people rush to Pinterest whenever they want to make something. However, the search can be annoying, especially if you are looking for good tutorials. Searching for “DIY picture frame” will most probably lead you to some nice photos with a link that goes nowhere! Do you love idea of creating your own photo frame? Here are tips on how to make a picture frame.
How to Make a Wooden Picture Frame
- Drill and bit set
- Miter box or miter saw and handsaw
- A pack of 4 corner braces, #315661
- 23/32-in x 1-1/2-in x 8-ft primed MDF, #5733
- Self-leveling hanger, #62958
Start off by printing the picture you want to frame on stiff paper. Determine the lengths of the frame pieces by cutting from 1-1/2-in-wide material and subtracting 1-in from the width and height so that the frame overlaps the picture by 1-in all round. These measurements are for the inside of the mitered frame pieces.
Double the width of the material (1-1/2-in) and add that number to the inside length to get the outside length of the frame piece. For example, a 12-in by 15-in frame will require frame pieces measuring 14-in and 17-in on the outside edges.
Cut 4 frame parts that are about 1-in longer than the intended outside length. Rotate the miter saw table anti-clockwise to 45 degrees and miter cut one end of each part to be placed against a stop block. Start with the long pieces so that in case you make a mistake, you can still use them for the shorter sides.
To make a stop block, miter cut one end of the frame material measuring 6-in long. To cut the longer side of the frame to the required length, rotate the saw table clockwise to the opposite 45 degrees and adjust the stop block. Cut both pieces to the same length. Adjust the stop block accordingly to cut the shorter frame pieces to length.
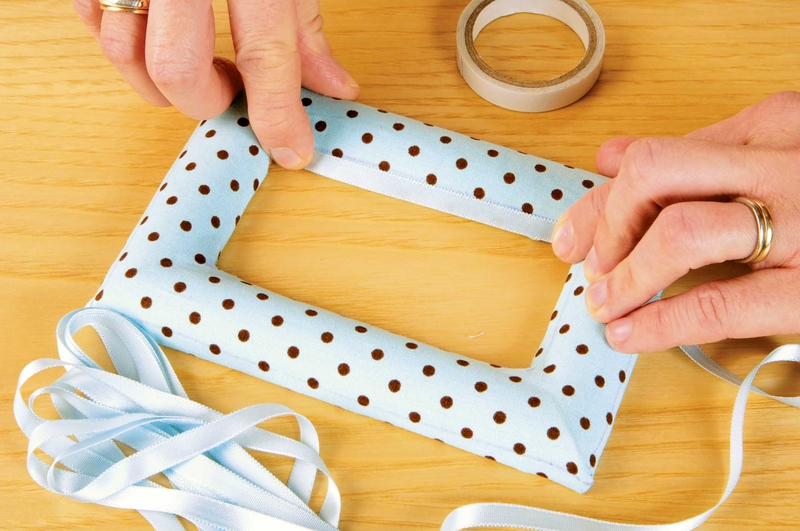
Arrange the frame parts in alternating lengths end to end on a flat surface. Tape the outside of the frame where the miter tips touch ensuring to leave no space between the frame pieces. Apply glue on one side of each pair of miters and join the ends. Tape the remaining corner. Press each corner flat against the work surface. Remove the tape after drying.
To mark out the screw pilot holes, place a corner brace at the 1/8-in mark from the outside edge of a corner. Drill the pilot holes and screw in the brace. Repeat this to install all the braces.
Screws that come with the braces are usually long and may go through the thickness of the frame material and split the frame. To avoid this, leave a little allowance when drilling the pilot holes. Drive only ¾ of the screw into the plot hole and back it out to prevent it from showing on the front side of the frame. Remove the sharp tip of the screw using a file or grinder and finish attaching the braces.
Place a hanger at the centre of the upper back edge and nail it in. Add spackling or putty at the corners and leave it to dry. Apply two coats of spray paint on the frame and let it dry. Place the picture at the centre on the back of the frame. Stretch one edge flat and hold it in place using painter’s tape. Do this for all sides.
How to Make a Cardboard Picture Frame
- 2 types of paper (e.g. beige tissue paper and Skyvertex)
- Paint brush
- White glue
- Cardboard (2mm by 0.5mm thickness)
- Cutter
- Scissors
- Pencil
- Equerre
Cut two cardboard pieces measuring 18cm by 13cm from the 2mm thick cardboard and name them A. Cut two hollow frames measuring 18cm by 13cm with a border measuring 2.5cm and name them B. Cut another set of hollow frames measuring 17.5cm by 12.5cm and a border of 2cm and name them C. Cut 2 other U-shaped cardboard pieces measuring 17.5cm by 12.5cm and a border of 1cm and name them D.
Glue the A pieces on the wrong side of the skyvertex paper. Make sure the rectangles are parallel with a 2cm space between them. The paper should exceed the rectangles by 2cm.
Cut paper angles on the 4 corners, fold the paper and glue it on the cardboard. Cut another piece of paper and glue it at the centre to cover the region between the two rectangles. Make a hinge to fold the frame. Cut 2 rectangles on the beige paper measuring 13cm by 18cm. Glue them on the inside of the frame. At this point, the back of your frame is ready.
Glue B pieces on top of D pieces. Cut two rectangles from the beige paper and glue on the front. Cut the angles, centre fold and glue on the back. You must have 2 beige frames at this point.
Glue the brown rectangle paper on C pieces with the wrong sides together. Cut angles on paper. Fold and glue the paper. At this point, you should have two brown frames.
Glue the three pieces together. Start by gluing the beige frames on the back with one on either side leaving space in the middle for the hinge. Glue the brown frame on the topside of the beige frame. Put the frames under a heavy object like a pile of books just to make sure the pieces stick together.
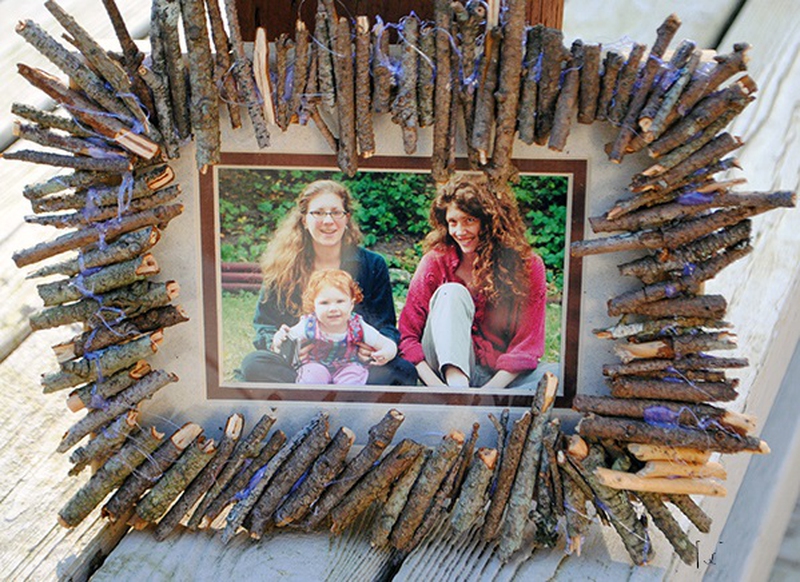
How to Make a Picture Frame with Twigs
- Twigs
- A wooden frame
- Photo mat to fit frame opening
- Permanent marker, fine tip
- Photo to be framed
- Glue sticks and high temperature glue gun
Gather some fallen twigs outside your house or at the park. Go for the thin dry ones that can snap into smaller pieces easily. Snap each twig into pieces that are long enough to span the width of the frame. Ensure you have enough twigs to cover the frame completely. You can place the twigs horizontally, vertically, or at a certain angle to create different patterns.
Preheat the hot glue gun until the glue flows out of the tip upon squeezing the trigger. Apply the hot glue on the frame and place the twigs immediately one by one. Hold the twigs in place until the glue hardens. Be very cautious if children are helping out since glue guns can cause burns.
View All Comments /Add Comment