
Every spring with the relief of melting snow and greening trees, winter-weary homeowners across the country scramble to their decks for some much needed quality time in the sun. If this sounds like you, why not give that old wood deck a quick once-over to see if it sustained any damage during the winter? Although water typically takes years to rot through cedar, pressure treated, or other exterior-grade woods, I always seem to notice deck damage more in the spring than in any other season. If you do find yourself up against a damaged deck board this year, here are three easy steps to getting it fixed before peak barbecue season rolls around.
Part 1
Step 1: Find the Rot Before it Finds You
Anyone who’s ever done it will tell you it’s no fun putting your foot through a rotted deck board. If you’re in need of an excuse to spend a little time in the yard anyway, take a few minutes to see if you’ve got any problem spots, especially in areas of high moisture concentration (e.g. places where snow or ice collects, areas close to ground level or where vertical surfaces meet your deck), and see if you can find any signs of rot. The best way to do this is to apply pressure with your finger or lightly tap at the suspected area with the butt end of your chisel or screwdriver. If the wood yields to any sort of pressure, it’s probably rotted and a good candidate for repair. I found this little gem in a spot where snow and ice like to dam up on my own deck and hang around until early spring:
This damage might not look too serious at first glance, but beneath the relatively unscathed surface of this board is quite a bit of very severe water rot. It started on the underside of the board and at the edge of the joist to the right, and then spread towards the left, into the joist bay. Given another season this board very well could have broken if stepped on.
Step 2: Remove the Rot
Before you go ripping anything out, it’s always a good idea to have your replacement material on hand. If there’s anything more dangerous than a rotted board, it’s a gaping hole in your deck. Be sure to complete your repair with whatever material was used in its initial construction. If you’re removing rotted 5/4” cedar, replace it with fresh 5/4” cedar. 2x4 mahogany replaces 2x4 mahogany, 2x6 pressure treated replaces 2x6 pressure treated, and so on. If you are in doubt of the species of wood covering your deck, try to bring a small sample of it to your local lumber yard. Most times they'll be able to give you an idea of what it is.
Some additional poking around should reveal the extent of your rot situation. Even if it’s relatively contained, I usually like to remove at least 32” worth of material because smaller patches tend to be less aesthetically pleasing and structurally sound. Keep in mind that both ends of your replacement board should land as close to halfway on a joist as possible. Using your speed square, mark your cut lines accordingly. Here you’ll notice that I offset my line just slightly in order to avoid the existing nails.
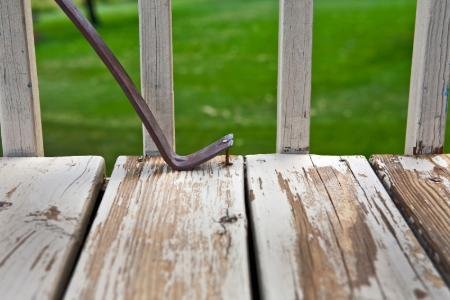
Some folks are comfortable cutting this close to nails, but if you are not, then take this opportunity to remove the nails with your nail puller, being careful not to do any more damage than necessary to the part of the board that you will not be removing.
Now set the depth on your circular saw so that the blade extends to about 1/8” below the lower surface of your replacement material:
Any time you’re cutting with a circular saw it’s best to position yourself to the side of it, rather than directly behind it. If the saw kicks back you want it to have a free path away from your body. Position the front of the saw’s fence on the next adjacent board, with the back angled up and your thumb on the blade guard lever so you can plunge the blade into your cut line. See this article for more information on performing plunge cuts with a circular saw. This is about what it’ll look like:
Make your cut, being careful not to cut into the board in front or in back of the board you’re cutting. Being that you’ve set the depth on the blade, you’ll only be cutting approximately 1/8” into the joist below, which is just fine. Due to the curvature of the blade, you will end up with a cut that makes it completely through the board in the center, but leaves you with a little material left to contend with on either side. Using your SHARP chisel and a hammer, cut straight down through this remaining material in order to complete the cut you started with your circular saw.
Repeat as necessary, pull all nails that stand between you and removing the rotted board, and then cut a wedge out of part of the section you’re removing. This will give you some room to work and pry up your board. Be sure to make your opening in the space or “bay” between two joists.
Now pry up your rotted section of board and clean up any rough edges with your hammer and chisel.
Step 3: Replace the Board
Once you’ve got a clean opening, take a measurement and cut your replacement piece. Set it in place and secure it with 8d (8 penny) galvanized ring shank nails (for 5/4" cedar or pressure treated wood).
*Carpenter's tip: if you’re hand nailing your replacement piece in place, give the tips of your nails a few good taps with your hammer first. This dulls the tip of the nail, allowing it to break through the wood fibers rather than drive between them. This in turn reduces your risk of splitting your boards, especially when nailing at the ends.
Be sure to properly toenail your seams,
…and you're ready for your next deck party.
View All Comments /Add Comment